When working with the Microsoft Graph API or introducing the API to colleagues I often get asked about the steps required to obtain an access token for the API with PowerShell. Out in the wild, I’ve spotted many different ways and lots of implementations still relying on the ADAL (Active Directory Authentication Library) despite the fact that this client library is superseded by MSAL (Microsoft Authentication Library). So let’s talk about acquiring access token “in stile” with the most simple method available.
Why do we need an access token?
When talking about the Microsoft Graph API an access token fulfills two roles, first: prove authentication (proof of identity) second prove authorization (permissions). Each request needs to submit a request-header that contains the access token.
For an API it’s crucial to validate the authentication and authorization for every request. Otherwise, requests could be made to resources the actor has no access to.
What’s inside the access token
You did probably stumble over the terms “bearer authentication” or “bearer token” these describe a mechanism within the OAuth 2.0 Authorization framework to authenticate requests with access tokens. Tokens are issued by the authorization server (Azure AD) and contain a server-generated string in the format of a JSON Web Token (JWT) with the following information (the list is not exhaustive and truncated to only contain the most interesting parts):
| Key | Description |
|---|---|
| aud | audience of the token which refers to a well known app identifier, like the Microsoft Graph API |
| appid | enterprise app id in your tenant |
| iss | issuer of the token, refers to your Azure AD Tenant as IDP |
| iat | issued at datetime in UNIX epoch time |
| nbf | not before, start datetime of the validity period in UNIX epoch time |
| exp | expiration datetime in UNIX epoch time |
| scp | service principal permissions |
| tid | tenant id which issued the token |
And here is a real bearer token body which I decoded (also truncated):
| |
Of course, the token contains also parts to verify the integrity by leveraging digital signature. These are stored in the header fields like “nonce” and “x5t” (contains public key).
Just before publishing this post I also found a claim list by microsoft which documents included fields in the token.
Available options to acquire tokens
Now let’s have a look about the available options within Azure AD to obtain access tokens and some use cases:
| Option | Example Use-cases | Permissions Type | OAuth Terminology |
|---|---|---|---|
| Interactive | Scripts which run interactively on-demand with user sign-in | Delegated | authorization code flow |
| Client secret | Unattended automation with secret stored in a key vault | Application | client credentials |
| Certificate | Unattended automation like scheduled tasks, azure automation | Application | client credentials |
(This list is also not exhaustive but contains the most used and adopted scenarios and flows)
App registration
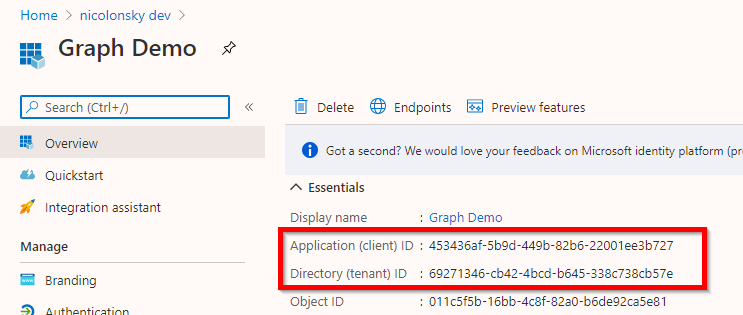
No matter which option we choose to acquire tokens and want to interact with the Graph API we need an app registration. After you created the app registration note down the following details:
- Application ID
- Tenant ID (you can also use a DNS name of a registered domain)
Reply-URLs when using Interactive (authorization code)
The authorization server (Azure AD acting as identity provider) returns access tokens for Interactive flows only to registered reply-URLs. These can be added under the “authentication” section of your app registration:
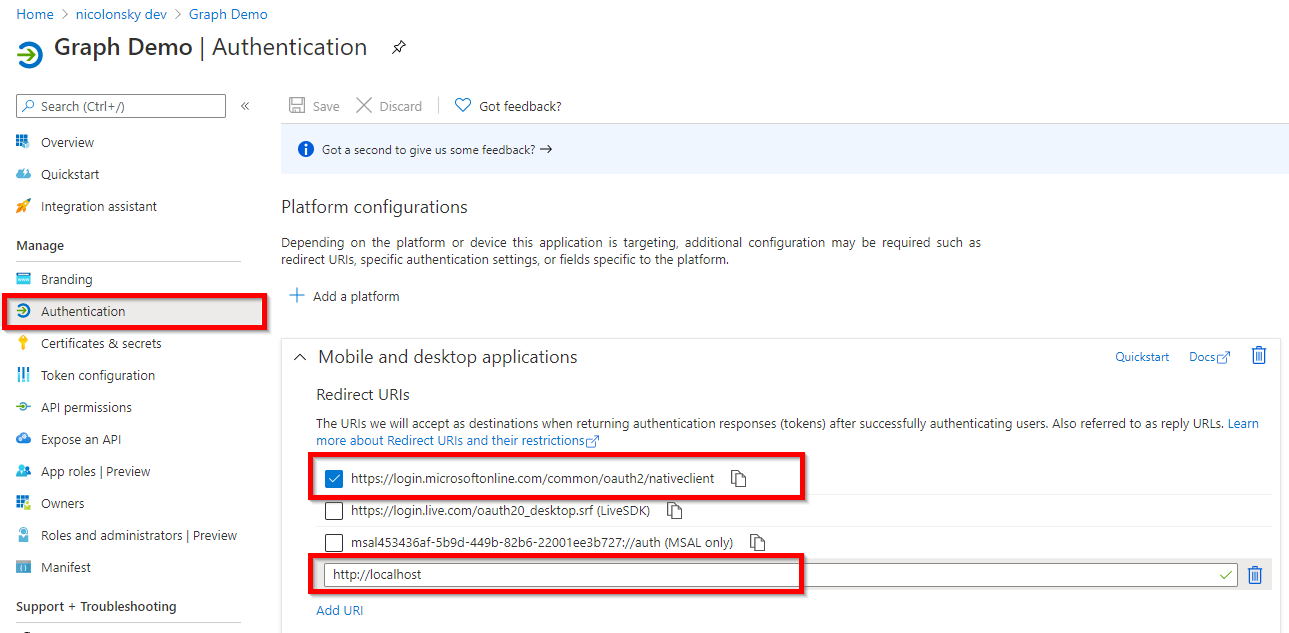
- For PowerShell 5.1 we need to add: https://login.microsoftonline.com/common/oauth2/nativeclient
- For PowerShell core: http://localhost
To ensure backward compatibility for other colleagues not using PowerShell core I mostly add both reply-URLs. {: .notice–info}
PowerShell examples
Fo the PowerShell examples we’ll use the MSAL.PS PowerShell module. It supports all recent PowerShell platforms, including PowerShell core (e.g. PowerShell 7 and Azure Functions 😎). As the name indicates the module relies on MSAL. Furthermore, it implements an in-memory token cache to persist acquired tokens, optionally you can enable toke caching on your disk.
You can install the module on your machine with:
| |
If you encounter issues because of PowerShellGet follow these instructions.
Within the PowerShell examples I’ll use splatting which allows passing commandlet arguments with a hashtable because it looks very nice and ensures vertical density. {: .notice–info}
Interactive (authorization code flow)
The interactive authorization code flow pops-up either a login or browser window and you are prompted to enter your Azure AD username and password.
| |
Behind the curtain we can trace a request to the OAuth 2.0 authorize endpoint which initiates the sign-in process:
| |
The following request parameters are passed via the request URL:

After the sign-in, the access token is served to the reply URL specified in the request URL parameter redirect_uri http://localhost:2518. The MSAL PowerShell client then receives the access token from the authorization server.
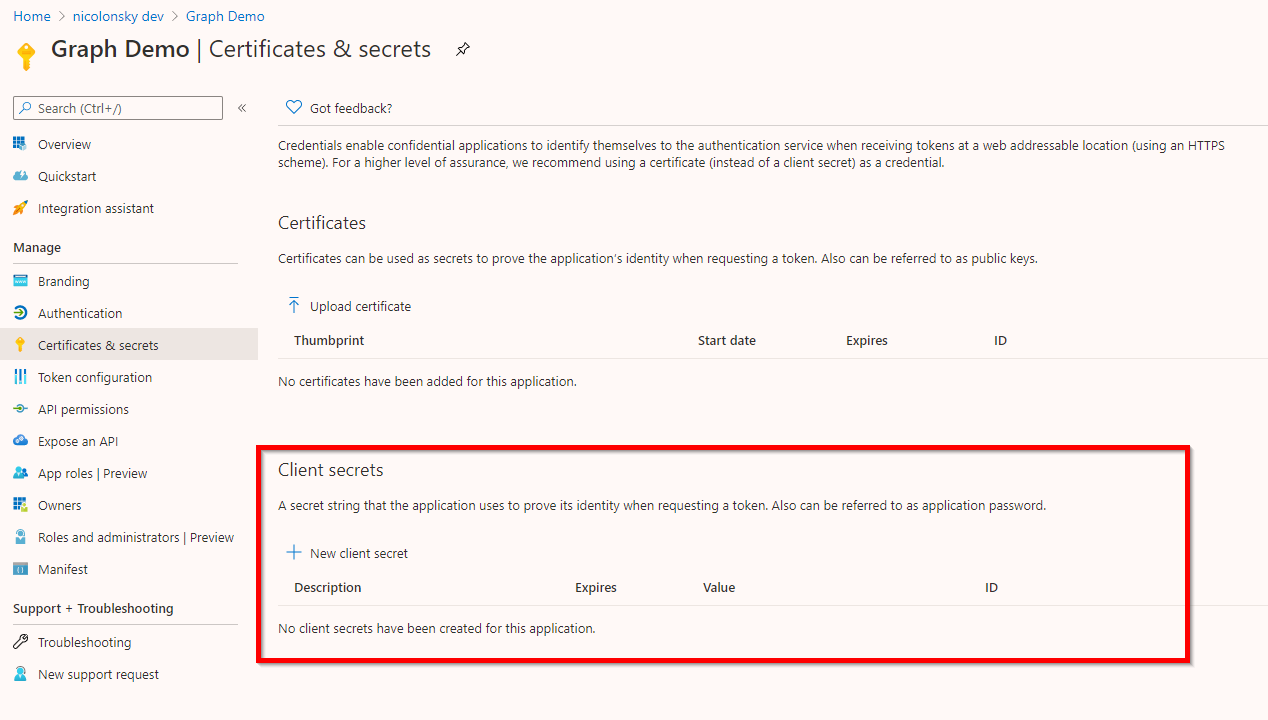
Client Secret
A client secret allows unattended authentication and the secret needs to be added to your app registration. The commandlet requires the client secret as a secure string parameter.
You can create a new client secret directly from the app registration:
| |
Never EVER check-in client secrets to git version control as they will remain in your commit history. Treat them like credentials, and of course, you don’t want to store credentials in plain text, do you? (I invalidated mine directly after coding the examples 😉) {: .notice–danger}
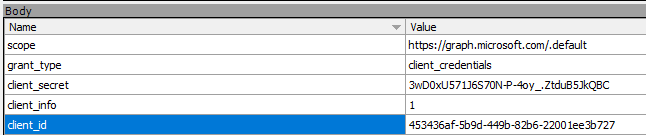
Behind the curtain we can trace a request to the OAuth 2.0 token endpoint of your AAD tenant with the client secret and application id in the request body:
| |
Certificate
Certificates also allow unattended authentication. The certificate and the corresponding private key need to be present in an accessible store.
For this purpose a self-signed certificate is sufficient and you can easily generate one with PowerShell and export the public key:
| |
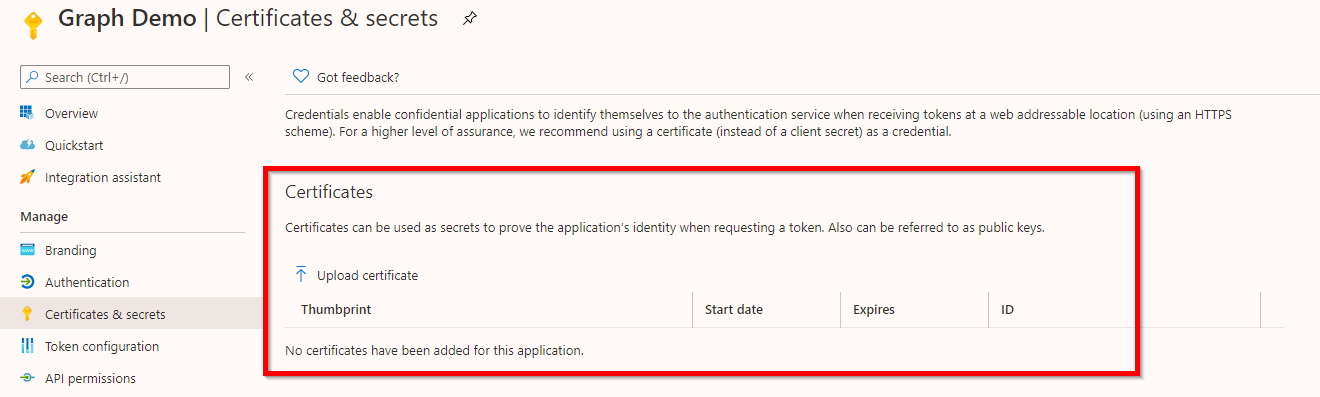
Afterward, upload the exported public key to your app registration:
And now you are ready to acquire your token with the certificate we just generated:
| |
Behind the curtain we can trace a request to the OAuth 2.0 token endpoint of your AAD tenant with the raw certificate assertion and application id in the request body:
| |

Building a request header
To actually use the acquired access token we need to build a request header that we include in http requests to the Graph API.
A PowerShell object instantiated from the Get-MsalToken commandlet exposes a method called CreateAuthorizationHeader() to include the Bearer token in the request header you use for subsequent requests:
| |
Token cache
In memory tokens can be cleared with:
| |
For non-interactive flows you can pass the -ForceRefresh parameter to acquire a new token which is not served from the token cache.
Conclusion
This very detailed post guided you through different ways to obtain access tokens for your next PowerShell automation with the Microsoft Graph API. As a takeaway I always recommend using the MSAL.PS PowerShell module because this will save you lots of time instead of writing custom code to acquire access tokens. Furthermore, for unattended scenarios I always recommend using certificates over client secret because they are better protected instead of a clear text client secret.
There has been a lot of Auth 2.0 and OpenID Connect terminology and if you want to follow up about these frameworks I can recommend you the following resources:
- OAuth 2.0 and OpenID Connect protocols on Microsoft identity platform
- OAuth 2.0 and OpenID Connect (in plain English)
Happy token acquisition.